SMART Board Basics
PDF Version: SMART Notebook Basics
Interface
- Begin by clicking the SMART Notebook software icon on your desktop.
- When the SMART Notebook interface appears, you will notice:
- The page area
- The menu
- The toolbar
- The tabs
ToolbarTabs - You can move the tabs to the left side by clicking the moving side bar icon.

Toolbar
- Clicking on the Pens button will open additional options in the tool bar which allow you to select: the pen type, the line type, the line colour, the line style, and transparency.
- Clicking on the Text button will open additional options in the tool bar which allow you to select: the font type and size, the font styles (bold, italic, underline), the alignment, text colour, and transparency.
- Clicking on the Line button will open additional options in the tool bar which allow you to select: arrows, line type, line colour, line style, and transparency.
On the right side of the tool bar, there are additional options for: - Selecting

- Erasing

- Fill colour

- Creating shapes

On the left side of the tool bar, you can find options such as: - Switching between pages
- Undo & redo

- Adding or deleting a page

- Saving a file or opening a file

- View screens

In the middle of the tool bar, you can find the following options: - Paste & Delete

- Screen Capture

- Show/Hide Screen Shade

- SMART Document Camera

- SMART Exchange

- Inserting a table

- Insertng a measurement tool (ruler, protractor, geodreieck, compass

Tabs
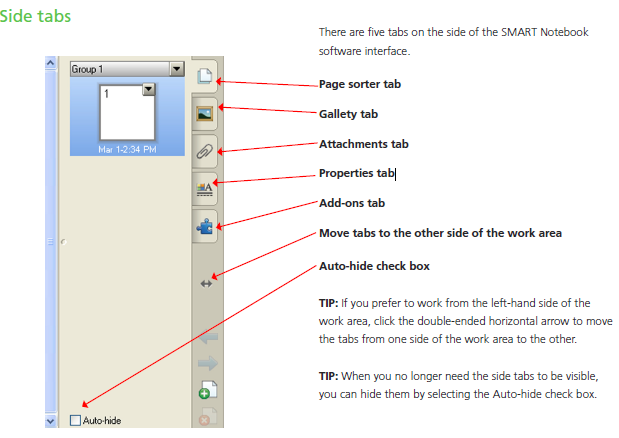
- The page sorter tab – shows a thumbnail image of each page in the SMART Notebook file. You can navigate to a different page, create page groups, and reorder the pages.
- The gallery tab – access custom pages, clip art, animations, audio clips and video clips.
- The attachments tab – add hyperlinks to, or attachments from, other software applications.
- The properties/format tab – format shapes, objects, and text.
- The add-ons tab – any software add-ons will appear here, such as Activity Builder and Extreme Collaboration.