SMART Board Basics > SMART Board Hardware Basics
SMART Board Hardware Basics
PDF Version: SMART Board Hardware Basics
Installation
- Connect your SMART Board interactive whiteboard system to a computer with a USB cable.
- Plug the SMART Board in to a wall outlet.
- Connect the computer to a projector with a VGA cable.
USB
VGA
POWER
Safety
- The projector beam is bright. Do not look directly at it!
- The projector can get hot. Do not touch it while it's on.
- Do not use a chair to increase a student's reach.
- Do not allow students to run where they might trip over cords or the floor stand; tape down cords.
Function
Anything you can do on your computer, you can do on a SMART Board interactive whiteboard.
- A press with your finger is the same as a mouse click.
- Durable surface; touch with intent for continuous writing.
Control Tray & Buttons
- You can write with your finger or a pen. The pen tray has sensors. Pick up the colour of pen that you want to use as digital ink, and start writing.
- Pick up the eraser from the pen tray and move it in a smooth motion over your notes to erase them.
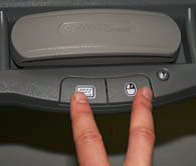
- You will notice two other buttons on the Control Tray:
- The Keyboard Button – press it to access the on-screen keyboard.
- The Right Mouse Button – serves as a right-click.
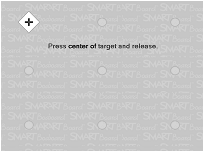
Orientation/Calibration
- Press and hold the Keyboard and Right Mouse buttons simultaneously until the Orientation Screen appears.
- Begin the orientation process at the upper-left corner of the Orientation Screen. Press your finger or pen firmly on the center of each cross in the order indicated by the white, diamond-shaped graphic.